NOTE: If you are replacing Admin Tools 1.x with version 2.0 or later, you will need to remove the original Admin Tools service before proceeding. This can be accomplished by performing the following:
Open a command prompt as an administrator in the app-server folder located in the root of the application.
Run nssm remove "Admin Tools Server"
For On-Premise Installation:
Unzip the Admin Tools build to the proper location
This can be under C:\intepub\wwwroot\admintools or any location you wish and then add this location as an application in IISInstall AdminTools/installs/MongoDB-windows-*.exe
If MongoDB isn’t installed on their server, install MongoDB using the mongodb-windows-x86_64-5.0.6-signed.msi file from the AdminTools/installs folder that was unzipped in step 1. Follow MongoDB's installation wizard to install (default options are fine). If there are any issues, see the MongoDB Installation Guide.Install AdminTools/installs/ARRv3_0.exe
The following IIS modules must be installed for Admin Tools for Portal. The URL Rewrite and Application Request Routing extensions are used by the application to create a reverse-proxy to forward requests through IIS to the server application.
Note: If your machine cannot access the internet, navigate to the AdminTools/installs/standalone folder and install both the requestRouter_amd64.msi and rewrite_amd64_en-US.msi files.Install & Start Windows Service
a. Run as administrator the AdminTools/installs/install_server.bat file
b. Click the three dots next to the Path setting. Navigate one directory up to the main Admin Tools folder and navigate to the /app-server directory. Then select the index.exe file and click the open button.
c. Click the Install service button
d. Run the services application on Windows and make sure that “AdminTools Server” is running. If not, start the service.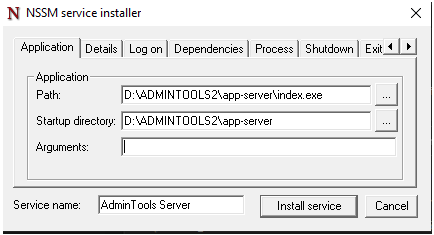
If you have already installed the service, you can run the edit_server.bat file
If you need to delete the service, run the remove_server.bat fileIIS: Enable Application Request Router proxy
a. Under connections, click on the server entry under the start page
b. In the center panel under the IIS section, double click on the Application Request Routing icon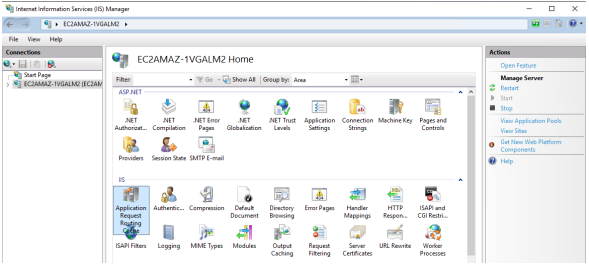
c. Click the enable proxy checkbox in the center panel, then on the right panel click the apply button.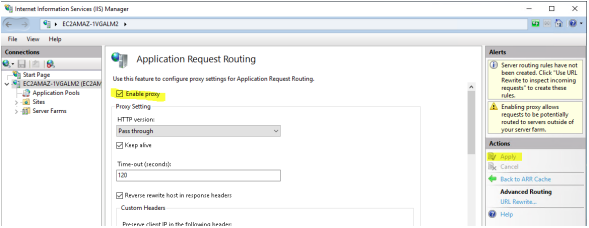
You can now open a browser to (https://yourdomain.com/admintools) and use the application.
Changing the port of your Admin Tools Service
Admin Tools by default runs internally on port (9180). For a situation such as you are running a beta version of Admin Tools 2.0 with 1.0 still running on 9180, you may need to change the port and run as a second service. To change the port:
Temporarily stop the Admin Tools 2.0 service if it is running.
In the AdminTools base directory, edit the web.config file and change line 33 from:
<action type="Rewrite" url="http://localhost:9180/{R:1}" />
TO:
<action type="Rewrite" url="http://localhost:9181/{R:1}" />Save this file and exit your text editor.
Under the AdminTools/app-server/config directory, edit the nodeconfig.json file and change line 2 from:
"port": 9180,
TO:
"port": 9181,Save this file and exit the text editor.
Restart the service or use AdminTools/installs/install_server.bat to create the service.