NOTE: Keep in mind that this install guide represents the minimum steps needed in an ideal environment with no variables or complications to overcome. It is not meant to serve as a comprehensive solution to any and all installation workflows and environments. Enterprise expertise is still essential for handling this installation.
- If you are unsure about whether Admin Tools for Portal can be installed on your infrastructure, please visit our product page, and contact us to request a technical meeting to discuss installation. We do sell Professional Services Installation Packages as an additional option to the purchase of Admin Tools for Portal.
NOTE: This is for Installing Admin Tools for Portal for the first time. If you need to upgrade to a newer version of Admin Tools for Portal, please see the following Article: How To Update Your Admin Tools for Portal With A Newer Version.
1. Requirements for receiving a licensed build from GEO Jobe
In order to receive a licensed build of Admin Tools for Portal, the following information must be provided to GEO Jobe.
The URL where Admin Tools will be installed (the URL that will appear in the browser’s address bar when accessing the tools).
The URL of each Portal including the host name and web adapter.
Whether or not IWA is being used for each Portal. For Portals not using IWA, an OAuth App ID must be created and provided to us for each Portal via registering a Web Mapping Application item. The URL of Admin Tools must be set in the Valid Redirect URI’s of the Web Mapping Application item. If the Admin Tools is being hosted on the same server as a Portal, the option for app registration may not show up and this is a known issue by ESRI.
Regarding Registering Admin Tools for an OAuth App ID (for Non-IWA):
Add a brand new application, call it "Admin Tools", and register that one. That will generate an "App ID" (NOT THE SAME AS THE ITEM ID). Then, add the full URL of where admin tools will be running from (i.e. http://domain.com/admintools/ and/or https://domain.com/admintools/) to the "Redirect URIs" on the Admin Tools application.
Note: The application doesn't have to actually DO anything, it just has to exist and be registered, that way we can log in. It acts as is the gate Admin Tools goes through.
- For a detailed, step-by-step guide on how to do this, please see "How To Register Admin Tools for Portal for an OAuth App ID (Non-IWA Installs)"
- NOTE: Please ensure that .NET 4.5 framework is installed for your IIS Application Pool.
2. Request a new build from GEO Jobe
All of the above information will be stored in our license database so that any future builds will already contain your App IDs and Portal URLs. We use this information to generate a custom build just for your environment.
3. Unzip the contents to the zip file provided by GEO Jobe
Unzip the contents of the zip file to the web-accessible directory provided to GEO Jobe in step 1.
4. Convert the folder in IIS to an application
Convert the folder from step 3 into an application.
Application Server Installation (Windows)
1. Requirements for hosting the Admin Tools Server
The Admin Tools Server application is written in JavaScript and runs on Node.js. It is recommended that Node.js be installed on the machine hosting the application, however it is not required. See: Installing Without Node.js on the Web Server.
2. Install MongoDB
Download MongoDB 3.4.1 Windows x64 and install.
If there are any issues, see the MongoDB Installation Guide.
- Configure a Windows Service for MongoDB
NOTE on Mongo.cfg
NOTE: Do NOT use tabs in the mongo.cfg
3. Install Required IIS Modules
The following IIS modules must be installed for Admin Tools for Portal. The URL Rewrite and Application Request Routing extensions are used by the application to create a reverse-proxy to forward requests through IIS To the Node.js server application.
4. Install Windows service
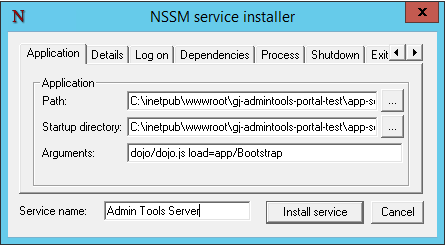
Open a command prompt as an administrator in the app-server folder located in the root of the application.
Run nssm install "Admin Tools Server"
Path: choose the node.exe in the app-server folder or C:\Program Files\nodejs\node.exe if Node.js is installed.
Startup directory: choose the app-server folder.
Arguments: dojo/dojo.js load=app/Bootstrap
Click Install Service
NOTE: The service can be removed with: nssm remove “Admin Tools Server”
5. Start the server
Using Windows Service Manager, start the Admin Tools Server service.
Additional Considerations
Additional solutions related to Installing Admin Tools for Portal:
If You Receive "Error: Command Not Found" for the NSSM Install “Admin Tools Server”
If You Receive "Error: Cannot Find Module"
If You Receive the Error: "The Service Name Is Invalid" When Running Net Start Mongodb
If You Receive "IIS HTTP Error 404.3 - Not Found"
If Your “Admin Tools Server” Service Is Not Starting
Related articles